General
Broken Item Listing Tips That Actually Get You Paid
Unlock cash from your damaged items with these broken item listing tips! Learn how to attract buyers, improve photos, and boost sales.

Broken Item Listing Tips That Actually Get You Paid
You have a cracked phone, a dead laptop, or a washing machine that stopped working six months ago. It’s sitting there, taking up space, and you assume nobody wants it. That assumption is costing you real money. These broken item listing tips will show you exactly how to prepare, photograph, describe, and price damaged goods so buyers find them fast and disputes stay rare. Whether you’re decluttering a garage or turning faulty electronics into a side income, the process is simpler than you think.
Table of Contents
Key takeaways
| Point | Details |
|---|---|
| Prep before you post | A quick three-point diagnostic cuts buyer disputes by nearly three-quarters before you write a single word. |
| Photos drive sales | Listings with three or more clear photos in natural light get significantly more visibility than those with one blurry shot. |
| Honest titles win | Including the brand, model, and specific fault in your title attracts the right buyers and reduces returns. |
| Price from sold comps | Search completed listings for your exact model and condition before setting any price. |
| Post-listing management matters | Monitoring views and responding quickly to questions keeps momentum and protects your seller rating. |
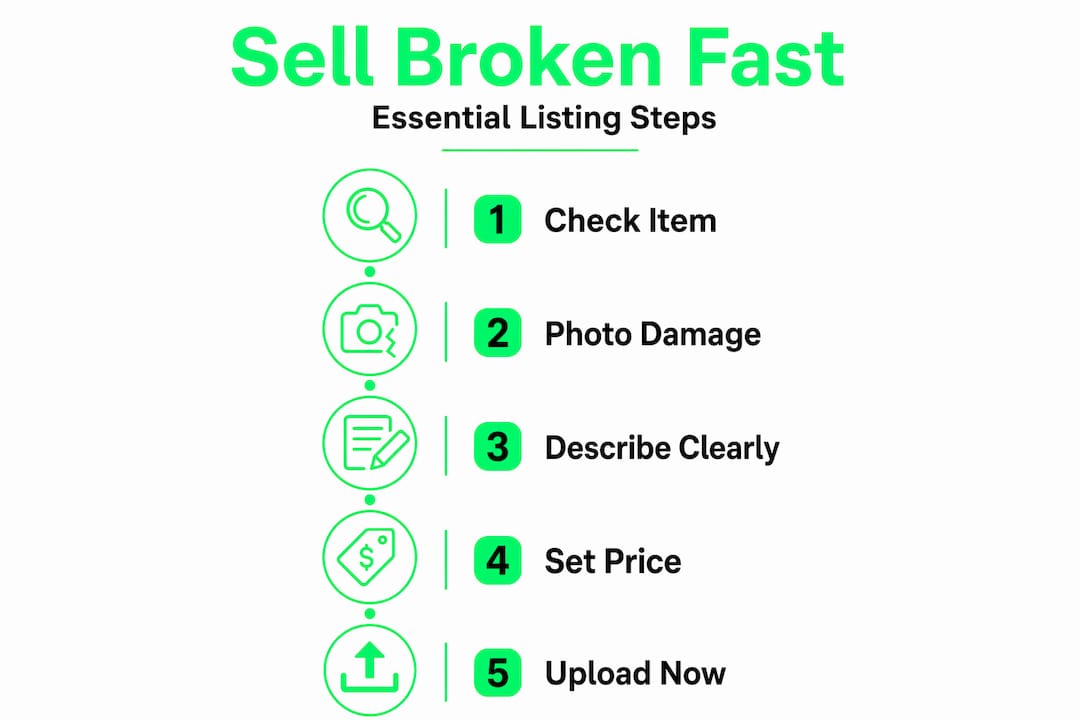
Broken item listing tips: what to do before you post
Most sellers skip straight to uploading photos and wonder why their listing sits for weeks. The work you do in the five minutes before you list is what separates a quick sale from a frustrating experience.
Start with a simple three-point diagnostic. Power the item on (or attempt to), check the screen or display for cracks and dead zones, and confirm whether ports, cameras, or key components are physically present. That’s it. Diagnosing these three factors reduces buyer disputes by 74% because you can describe exactly what works and what doesn’t, rather than leaving buyers to guess.
Next, gather what you need before opening any listing form:
-
Your smartphone for photos (the camera you already have is fine)
-
The item’s model number, storage size, or key specs (check the back panel or original box)
-
Any accessories still in your possession, like chargers, remotes, or cases
-
Your original purchase receipt or order number if you have it (helps with pricing research)
Then decide on your listing strategy. List items individually if valued above $100 and group anything below $50 into lots. A broken iPhone with a shattered screen is worth listing on its own. A bag of tangled charging cables and dead earbuds is a lot. This approach saves time and keeps your listing quality high.
Finally, understand the condition categories on whichever platform you use. “For parts or not working” is the standard qualifier for items that don’t function as intended. Using the correct category keeps your listing visible to the buyers who actually want it and protects you from disputes with buyers who expected a working product.
Pro Tip: Take 60 seconds to search your item’s model number on any resale platform and filter by “sold” listings in the same condition. This tells you exactly what the market will pay before you commit to a price.
How to create a listing that sells quickly
Speed matters, but not at the cost of accuracy. Listing broken gadgets efficiently takes under 90 seconds once you have your photos and notes ready. Here’s the workflow that works.
-
Take four photos. Shoot the front, back, and both sides. Then take a close-up of the specific damage. If the item powers on at all, take a photo of the screen showing whatever state it’s in. Natural light near a window beats any artificial lighting setup.
-
Write a keyword-rich title. Include the brand, model, storage or size variant, the specific fault, and the condition qualifier. “Apple iPhone 13 128GB Cracked Screen For Parts Not Working” tells buyers and search algorithms exactly what they’re looking at. Keyword-rich titles are critical ranking signals in 2026 marketplace search.
-
Write a short, honest description. Three to four sentences is enough. State what the item is, what’s wrong with it, what’s included in the sale, and your shipping method. No need for paragraphs of history.
-
Set your price using sold comps. Look at what identical or similar broken items actually sold for, not what sellers are asking. Asking prices are wishful thinking. Sold prices are reality.
-
Fill in every item specific field. Brand, model, condition, storage, color, compatibility. Complete attribute fields improve search ranking directly. Skipping them buries your listing.
Here’s a quick reference for structuring your description:
| Description element | What to include | Example |
|---|---|---|
| Condition statement | What works, what doesn’t | “Powers on but screen is cracked and unresponsive” |
| Included parts | Everything in the box | “Includes original charger, no case” |
| Known history | Age, cause of damage if known | “Dropped 3 months ago, no water damage” |
| Shipping details | Method, timeline, packaging | “Ships in padded box within 2 business days” |
Pro Tip: Listings with 3+ photos in natural light get 23% higher visibility in search results. If you only do one thing to improve your listing, add more photos.

Common mistakes that kill broken item sales
Even sellers with good intentions make avoidable errors. These are the ones that generate disputes, bad feedback, and unsold inventory.
-
Vague condition descriptions. Writing “sold as is” or “needs repair” without specifics is the single biggest red flag for buyers. Misleading or vague condition descriptions are a top cause of buyer dissatisfaction and returns. Be specific: “screen cracks in top left corner, touch still works” beats “cracked screen” every time.
-
Hiding damage in photos. Angling your shot to avoid showing the dent or scratch does not protect you. It guarantees a dispute when the buyer receives the item. Show the damage clearly and you filter out buyers who can’t handle it.
-
Wrong condition category. Listing a non-functional item as “used” instead of “for parts or not working” misleads buyers and violates platform policies. Use the correct category every time.
-
Overpricing for broken condition. Non-functional iPhones retain 18 to 32% of their original retail value. Pricing a broken iPhone 13 at $400 when working models sell for $450 will get zero traction. Price for the condition, not the nostalgia.
-
Missing item specifics. Leaving model number, storage, or compatibility fields blank removes your listing from filtered searches. The buyers most likely to purchase a broken item search by exact model because they need specific parts.
“Transparency in listing reduces the frequency and impact of buyer complaints and keeps feedback positive. Honest messaging creates trust and speeds successful sales.” — PSA: You Can Sell Your Broken Gadgets on eBay
The pattern here is consistent. Every mistake on this list comes down to the same root cause: prioritizing the appearance of value over honest disclosure. Buyers who specifically seek broken items for parts or repair are not scared off by damage. They are scared off by sellers who seem to be hiding something.
Managing your listing after it goes live
Publishing your listing is not the finish line. What you do in the 48 hours after posting often determines whether it sells or stagnates.
-
Check your view count after 24 hours. Most platforms show how many people have seen your listing. If you have under 10 views in the first day, something is off. Either the title is weak, the price is too high, or the category is wrong.
-
Respond to buyer questions within a few hours. Speed signals credibility. A buyer asking “does the charging port work?” is one answer away from purchasing. A slow response gives them time to find another listing.
-
Adjust price if views are high but no offers come. High views with no bites usually means the price is the problem. Drop it 10 to 15% and see if that changes behavior.
-
Confirm payment before shipping. Never ship before payment clears. This is basic, but worth stating.
-
Pack the item well and ship promptly. Broken items are often fragile. Bubble wrap, a sturdy box, and a tracking number protect both parties. Ship within your stated timeframe.
Pro Tip: Balancing speed with thorough condition disclosure is the real skill in selling broken items. A listing that goes live in 10 minutes with accurate photos and an honest description will outperform a listing that took an hour but buried the damage.
For returns and disputes, lead with transparency. If a buyer claims the item is not as described, go back to your listing and photos. If you disclosed the fault clearly, you have documentation. If you didn’t, resolve it quickly and learn from it. Sellers who handle disputes calmly and honestly almost always come out with their rating intact.
My take on selling broken items the right way
I’ve seen sellers overthink this category more than almost any other. They assume broken means worthless, so they either don’t list at all or they try to dress up the listing to hide the damage. Both approaches leave money on the table.
In my experience, the sellers who do best with broken goods are the ones who treat disclosure as a feature, not a liability. When you write “left speaker completely dead, right speaker works fine, screen has one hairline crack near the top,” you’re not scaring buyers away. You’re telling the repair technician exactly what they need to know to decide whether your item fits their project. That specificity is what gets you a sale.
I’ve also learned that starting small builds confidence fast. List one or two items, see how the process feels, and refine from there. The first listing always takes the longest. By the fifth, you’ll have a rhythm that takes less than 10 minutes per item.
The uncomfortable truth about selling broken goods is that the market for them is bigger than most people realize. Repair shops, hobbyists, parts hunters, and flippers actively search for exactly what you’re trying to get rid of. Your job is simply to make it easy for them to find you and trust what you’re selling.
— Ryan
Where to list your broken items for the best results
If you’ve been listing broken items on general marketplaces and watching them get buried under thousands of working products, there’s a better option.
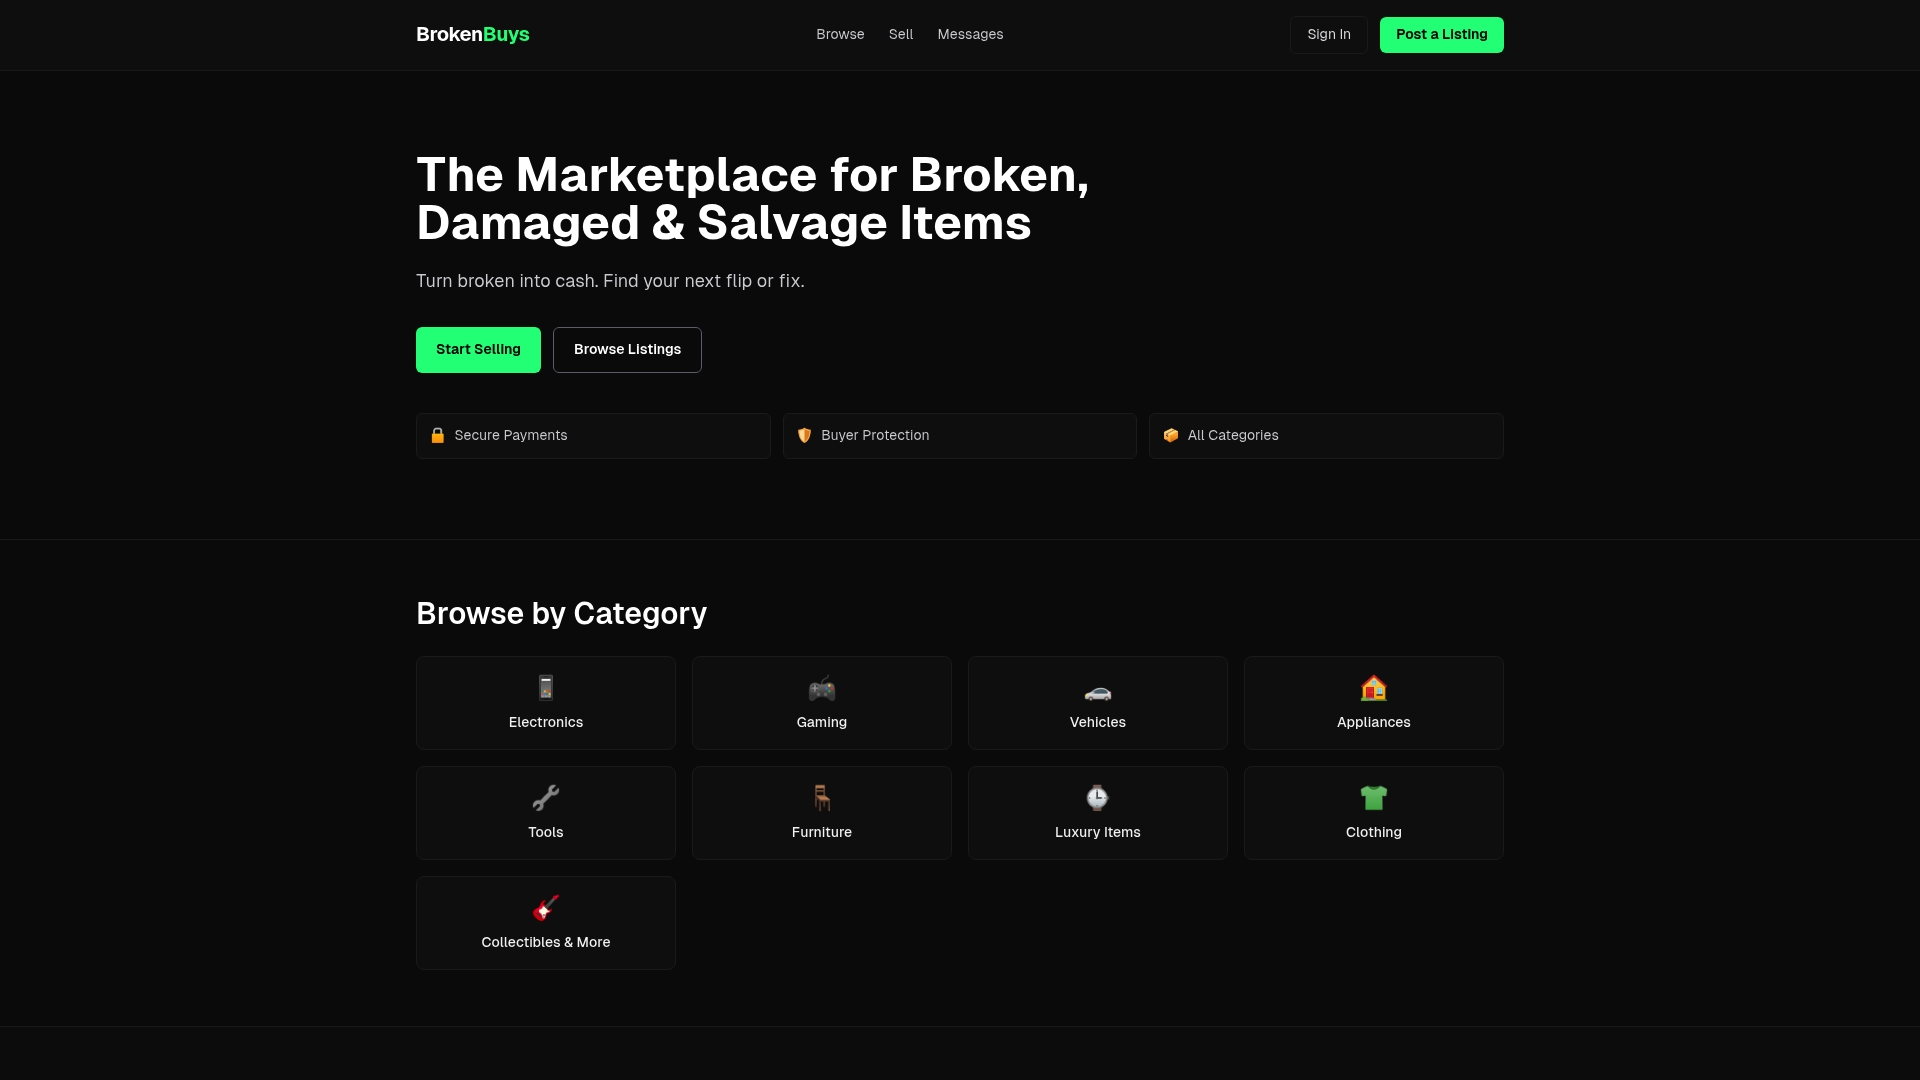
Brokenbuys is the only dedicated marketplace built exclusively for broken, damaged, and salvage items. Every buyer on the platform is actively looking for exactly what you’re selling, whether that’s a cracked MacBook, a non-functional washing machine, or a broken Rolex for parts. There’s no competing with listings for working products. Your item reaches repair technicians, flippers, and parts hunters who already know what they want. Payments go through secure escrow via Stripe, and both buyer and seller protection is built into every transaction. You can ship nationally or sell locally. All conditions are accepted.
FAQ
What photos should I include in a broken item listing?
Take at least four photos: front, back, both sides, and a close-up of the specific damage. If the item powers on at all, include a photo of the screen in its current state. Natural light produces the clearest results.
How do I price a broken item accurately?
Search completed and sold listings for your exact model in the same condition on any resale platform. Broken iPhones, for example, typically sell for 18 to 32% of their original retail price. Use sold prices, not asking prices, as your benchmark.
What condition category should I use for a non-functional item?
Use “For parts or not working” or the equivalent condition qualifier on your platform. This is the correct and honest category for items that do not function as intended, and it connects you with buyers who specifically search for broken goods.
How do I avoid buyer disputes when listing broken goods?
Describe the fault specifically, show damage clearly in photos, use the correct condition category, and fill in all item specifics fields. Transparent condition disclosure is the single most effective way to reduce disputes and keep your seller rating strong.
Should I list broken items individually or in lots?
List items individually if they’re worth more than $100 and group lower-value items into lots. A broken power tool worth $30 is a better lot candidate than a standalone listing. A broken gaming console is almost always worth listing on its own.